
AutoCad Architecture Install
Prior to installing hsbDesign, you’ll need to download and install AutoCAD Architecture.
(If you download any other version, the software will not work properly)
A free trial version of AutoCAD Architecture 2024 is available for download here:
Make sure when you are going through the information intake process, you choose AutoCAD Architecture.

EstiFrame Files Install
The Estiframe Design Team has developed and added upon what the hsb company has created. We have added and help develop many tools which will speed up and simplify the framing process. These include (but are not limited to) updated TSL’s, templates, simplified ribbon, additional commands, a full tool palette, additional hsb data, framing styles, additional checks for errors, material lists, EZX export, and layout sheets.
To get started, download the files below:


Then, save it to your C: drive
Then right click on the folder, click extract all, and click extract all
*If it is already unzipped, lust leave it and proceed to the next step

EstiFrame Files Setup
Open hsbdesign 24 (Should be an icon on your desktop), login to Autodesk, close hsbcad, open hsbdesign 24 again and login to hsbcad, and create a new drawing if you aren’t already in a drawing.
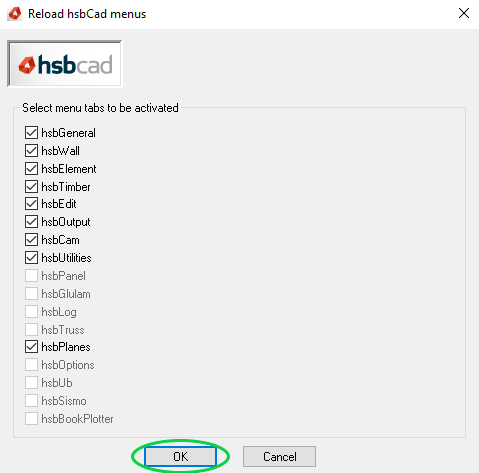
Before you start, if either of these 2 menus pop up at anytime, click OK
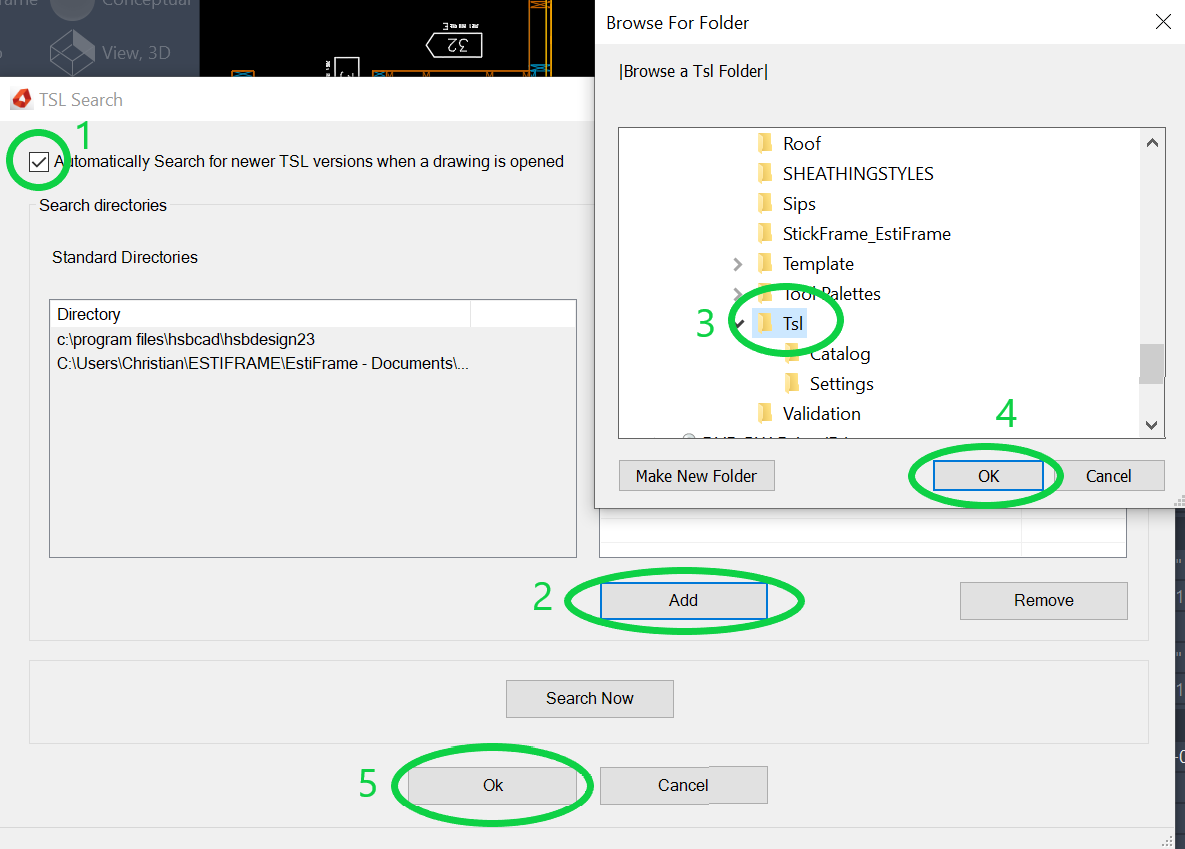
TSL Search
Click the hsb icon in the very bottom right of your screen and click TSL search settings

Click the check box in the top left, click add, then find the TSL folder which will be located at
C:\\EstiFrame_HsbCad\hsbCompany_Estiframe\TSL
Select it and click OK and OK
Profile Import
Click in the black space in the middle, type OPTIONS, and hit enter
Then click Profiles on the top, click import, then find the hsbcad_estiframe.arg file which will be located at
C:\\EstiFrame_HsbCad\Content\hsbcad_estiframe.arg
*If it isn’t showing, make sure your file type is set to .ARG*
Select it and click open

Click hsbcad_estiframe, click set current, then click apply

Template Setup
Still in the options menu, click the files tab in the top left, click the little + next to Template Settings, click the little + next to Drawing Template File Location, then click the arrow right below that, then click browse, then click the arrow next to your EstiFrame_HsbCad folder, click hsbCompany_EstiFrame and click OK

Click the little plus next to Default Template File Name for QNEW, click the arrow right below that, click browse, then find the Stickframe_2022.dwt file which will be located at
C:\\EstiFrame_HsbCad\hsbCompany_EstiFrame\Template\Stickframe_2022.dwt
*If it isn’t showing, make sure your file type is set to .dwt*
Click the file, click Open, click Apply, and click OK

Load Customization Files
Then type CUILOAD and press enter
Click APPMANAGER and then click Unload. Repeat this for everything EXCEPT ACA/ACAD and HSBMENU

Get your screen to look like this and then click browse

Then go to your ribbon folder which is located at
C:\\EstiFrame_HsbCad\Content\NorthAmerica\Ribbon
Then click EFribbon.cuix (Not efribbon.bak) and click open, click load, and click browse again. Repeat this until you load EFribbon.cuix, HSBNAUTILITIES.cuix, and hsbRibbon – NA.cuix
*Make sure your file type at the bottom is set to .cuix*

Get your screen to look like this and click close

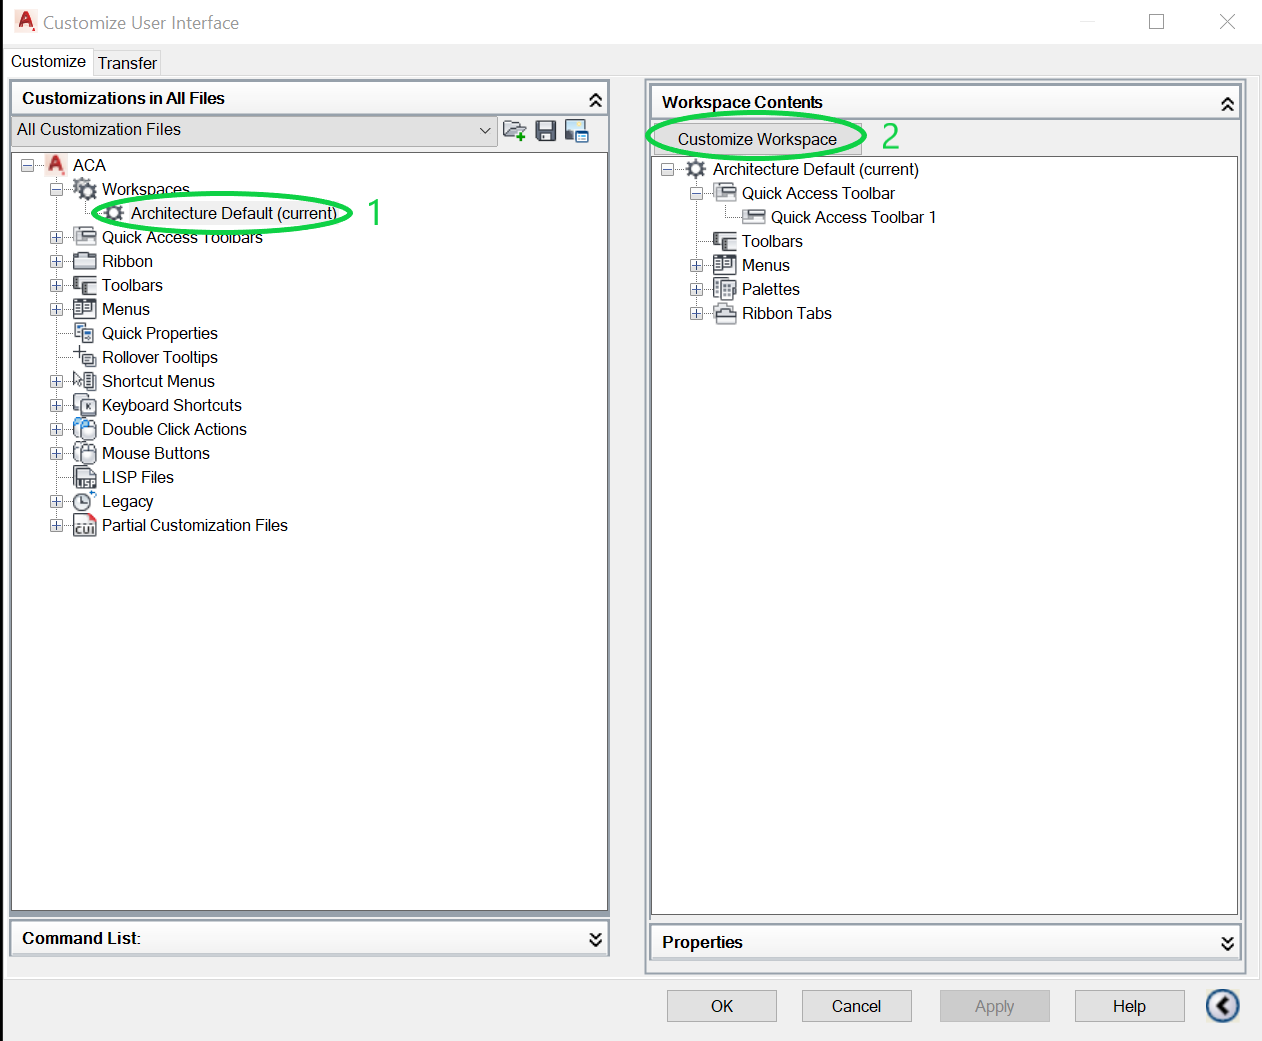
CUI Cleanup
Then type CUI and click enter
On the menu that popped up, click Architecture Default (current) and click customize workspace
*It may not say exactly Architecture Default, just click whichever has (current) next to it*
Click the little + next to Ribbon, then the + next to Tabs, then click the green check mark and uncheck output, parametric, visualize, 3d tools, collaborate, and view 2d
*You may have different tabs but the only things that should be checked are Annotate – ACA, Home – ACA, Insert – ACA, Manage – ACA, and View ACA*

Then scroll all the way down, click the + next to Partial Customization Files, then the + next to HSBMENU, and then click the green check mark to uncheck the box next to Toolbars
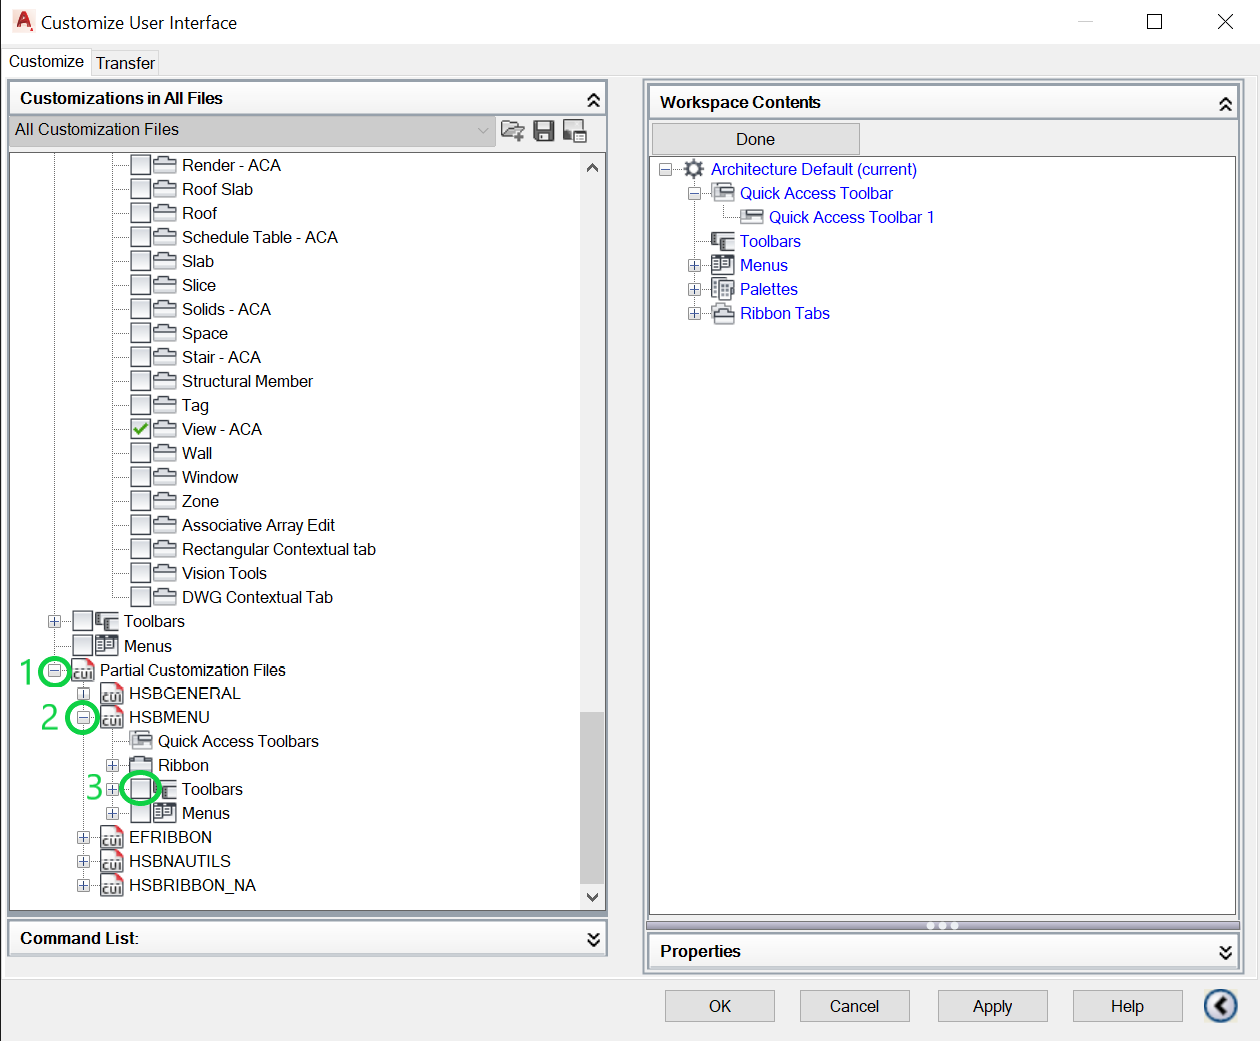
Then click the + next to Palettes, then click Properties and check below that everything looks like this. Also check Tool Palette after that
If it does not, click whatever is wrong, and then click the down arrow next to it and set it to the correct one
Once everything is correct, click Done, Apply, and OK

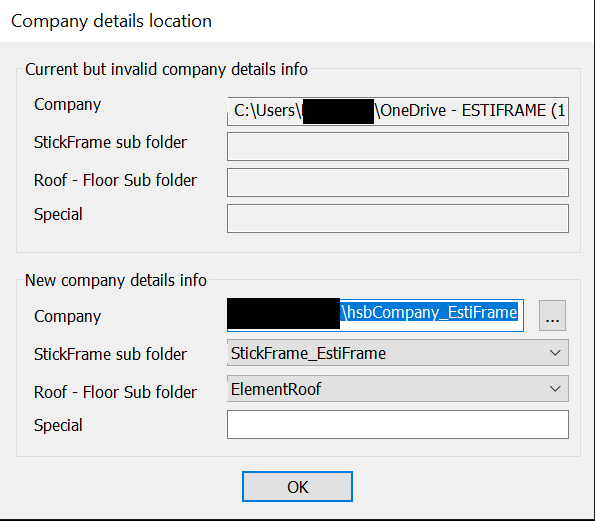
Settings
Type HSB_SETTINGS, hit enter, and check that the directory is set to StickFrame_Estiframe and ElementRoof. If it is not, click the 3 dots next to the company text box, click hsbCompany_EstiFrame which will be located at
C:\\EstiFrame_HsbCad\hsbCompany_EstiFrame
Click the folder and click OK and click OK again

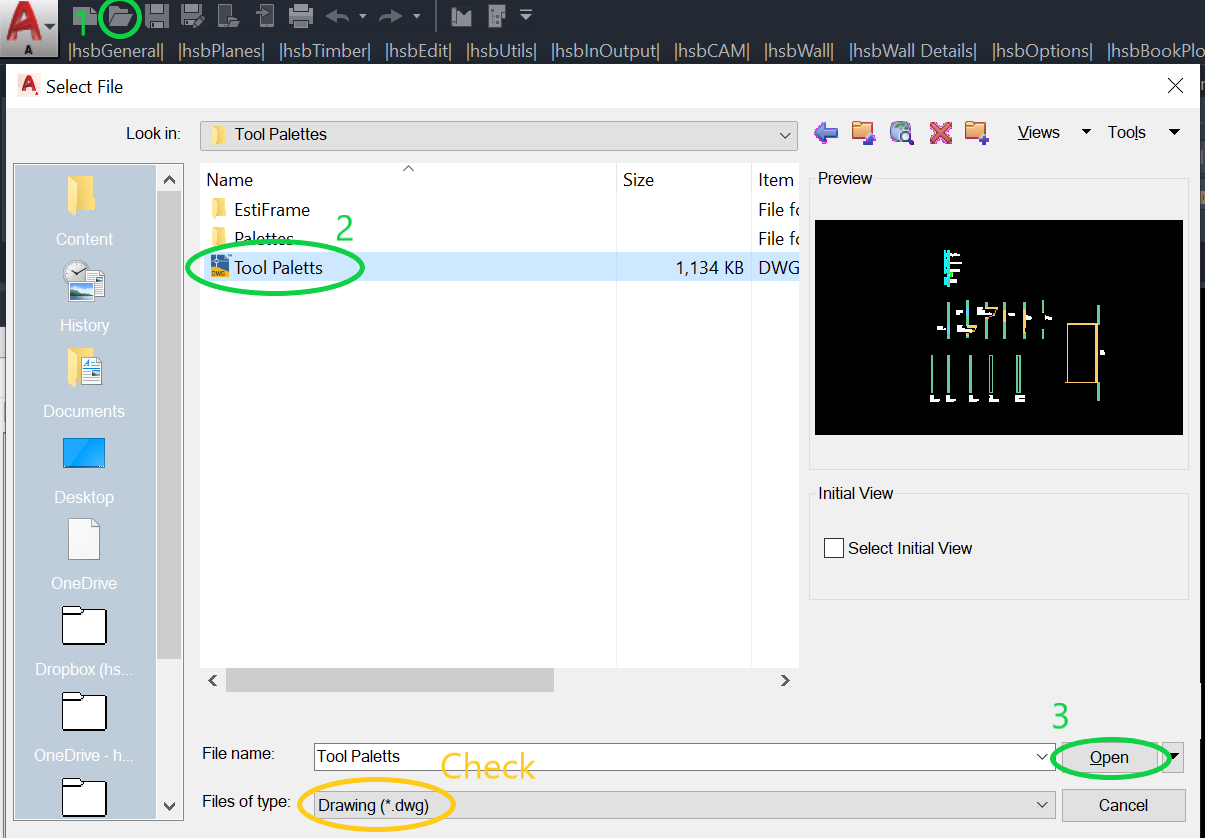
Tool Palette
Click the open folder icon in the top left, find your Tool Palettes.dwg file which will be located at
C:\\EstiFrame_HsbCad\hsbCompany_EstiFrame\Tool Palettes\Tool Palettes.dwg
Click it, and click Open
*Make sure your file type at the bottom is set to .dwg*
Right click at the top of your tool palettes toolbar, click new palette, and name it to EstiFrame

Then in your drawing, click a wall/window/opening and drag it into your tool palette. Repeat until your tool palette contains everything you want.
*You may have to rename some of the tools. To do so just right click on the tool, and click rename*
App Properties
If the app is in your tool bar, right click the hsbDesign app, right click the app again that popped up above the icon, and click properties
If the app is on your desktop, right click the hsbDesign app, and click properties

Next, you are going to change the “Target:” field. Scroll to the left untill you find “AutoCAD Architecture (US Imperial) hsbDesign25”.
Remove all the text in between those 2 quotes with “hsbcad_estiframe”.
The change will look similar to this.
C:\Program Files\Autodesk\AutoCAD 2023\acad.exe" /p "AutoCAD Architecture (US Imperial) hsbDesign25" /ld "C:\Program Files\hsbcad\hsbDesign25\Crx2023x64\Hsb_basehsb.crx
"C:\Program Files\Autodesk\AutoCAD 2023\acad.exe" /p "hsbcad_estiframe" /ld "C:\Program Files\hsbcad\hsbDesign25\Crx2023x64\Hsb_basehsb.crx"

You are finally Done! Please notify whoever set you up with the trial so you can get started with your training.